What are common causes of dry patches in turf?

By Michael Sutton AusGAP – December 10, 2020
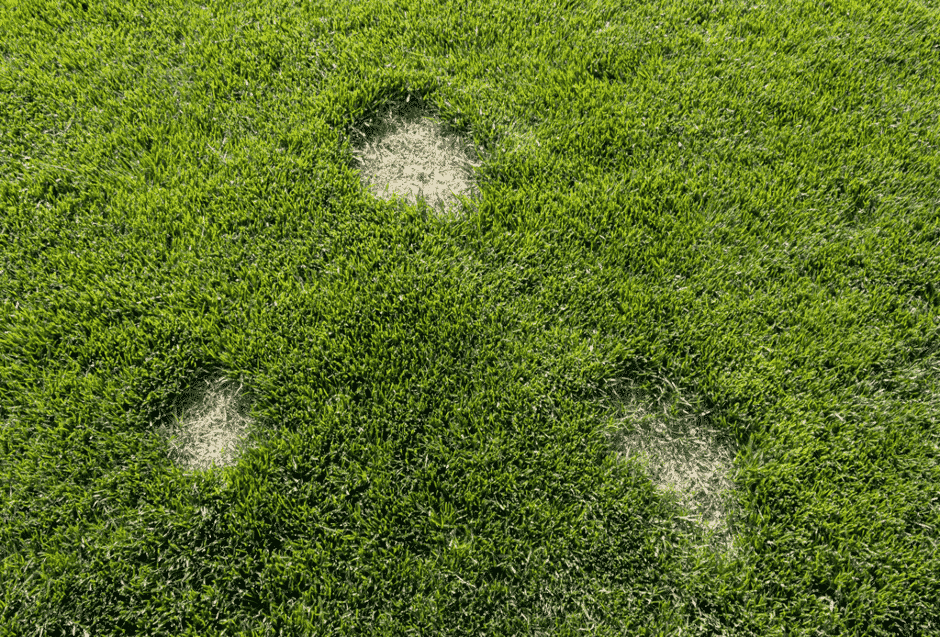
Dry patches in your turf are not all created by the same issue and some of the most common reasons for dry patch (dead spots) to occur are:
- Heat exposure (varied area sizes and shapes) – normally a combination of foot traffic, incorrect or insufficient watering practices, lack of water absorption (hydrophobic soil), reflective heat sources, direct heat over exposure.
- Dog urine (up to 20cm areas and varied shapes).
- Turf pest damage (varied area sizes and shapes).
Dry Patch Causes and Solutions
Usually localised dry patches develop in turf during the summer months. Water repellent rootzones within turf have always been present to some extent especially in predominately sand profiles. But these problems in all soil types have increased and can be affected by the number of issues such as disease and insect pressure, foot traffic, use of the turf areas.
Signs of dry patch appearing.
- Areas of the turf thinning out.
- Changed colour (blueish greys to browns) turning into bare areas.
- The exposed areas gain more heat stress from the sun and can become hard (depending on soil type).
- The bare patches become inept in water and nutrient absorption (Hydrophobic).
It is important however, to distinguish dry patch from simple drought stress.
Dry patch – is generally identified as an area of turf that dries out and becomes difficult to rewet even when copious amounts of water is applied.

It is regularly depicted by the presence of a water repelling from the soil profile (pooling and running off). The source of this water repellent soil has been linked to soil bacterial activity and also the breakdown of organic materials in the root zone as part of natural plant decomposition processes.
Drought stress – it differs from Dry Patch; this can be caused by there being no water repellent soil present, and the dryness can be a result of other turf related problems. For example, poor irrigation or poor root establishment and/or growth can have implications to the turf as they effect its ability to utilise the water which is made available.

It’s important to note that sometimes dry patches or spots are the results of fungi due to the residue it leaves on the thatch and soil.
How do I treat dry patches and drought stress?
The good thing is they can usually be easy enough to rectify, some ways to try and reduce them from appearing are:
1. Correct watering practices:
- Use of sprinklers and soaker hoses for a more consistent spread of water to the area. Try not to hand water with a hose as this can lead to irregularities in water applied to the required area. Installation and maintenance of an inground irrigation system can give optimal watering situations.
- Water turf in early morning and evening and its best to not water in the heat of the day. Watering at night can cause fungal issues in turf.
- Water for longer time periods, less frequently. Watering turf 2 – 3 times a week for an hour each time is much better than watering turf 6 times a week for only 15 minutes. You want to prepare the turf to be more drought tolerant. Frequent short watering’s will only cause turf to become drier and less drought resistant.
- Different turf types require different amounts of water, so take this into consideration when choosing a new turf.
- Varying weather conditions will require a change in normal watering routine. If there are a few days in a row of substantially hot weather, add some extra watering’s into the routine. Likewise, during wet weather, a reduction in watering and/or frequency could be required.
2. Aeration: An important step to fixing dry patches caused by heat and wear in turf.
- Aerate the whole turf area including the affected areas with a garden fork or a specialised aerator.
- Aeration of the turf will aid in reducing compaction of the soils profile and will support water and nutrients infiltration.
- Aeration is much easier after a rain event or deep watering. If the turf area is dry, don’t try to aerate until there is moisture present in soil profile.
3. Wetting Agents: This will assist water to absorb into the soil.
- Apply wetting agent to whole turf area at label rates and directions.
- After the application of a wetting agent follow with irrigation of the area. This will assist the wetting agent’s absorption into the soil profile to aid the water holding capacity of the profile.
4. Fertilisation: Promote new healthy growth.
- Apply fertiliser to a dry turf area at label rates and directions.
- Water fertiliser in thoroughly (unless label directs not too) and do not let it lie on the turf area for too long as it can burn the leaf blade.
Other Turf Patch Causes and Solutions
Urine burns from pets
Dogs can cause urine scalding when they urinate on the same patch repeatedly, dogs mechanically prefer to allocate one area of turf as their ‘toilet area’ and can really concentrate the urine in one area of turf.
The urine component that discolours the turf is a nitrogen compound and dogs naturally have high amounts of it.
It is assumed that the problem lies with the urine’s pH and refer to ‘acidic’ urine causing the problem. But this is incorrect; the culprit is the nitrogen, not the pH.

How do I treat this?
- Hydrate grass: Water is the key, try to saturate the area of turf with water right after the dog has urinated.
- Ensure pet is well hydrated: Dilution of the urine itself by aiding the dog in drinking more water. More diluted urine = less concentrated levels of nitrogen.
- Restrict pet to a localised area of the turf so that urination is not in a specific area.
- Use products like Dog Rocks (in dog’s water bowl), these products can improve turf within 5 weeks of use.
It’s important to note that female and the larger breeds of dogs are more likely to cause urine scalding on turf areas, as Females tend to empty their entire bladder in one go, unlike males that mark all around the yard in smaller amounts and larger dogs evacuate larger bladder quantities.
Turf Pests
Another common cause of brown patches in turf is pests such as turf grubs. While this isn’t good news it’s a curable condition.

How to identify Turf Grubs
1. Brown patches:
- From spring (specifically after spring renovation/fertilising), brown patches may appear, and patches of turf are able to be removed easily, this could be from turf grubs having consumed the root zone of the turf.
2. Bird activity:
- One of the most common indications is an increase in bird activity on turf areas.
3. Greyish-brown moth activity:
- These moths fly and land on the healthiest turf they can find to lay their eggs usually at dusk. In about 2 – 5 days the eggs become grub larvae and the caterpillars occupy the turf area between 18 – 24 days chewing on the leaf blade to develop into pupae. Then 5 – 8 days later will emerge as moths around your turf area to continue the cycle.

4. Black Beetle or white grub activity:
- Black beetles present in and crawling on turf leaves.

- White grubs present in the soil and root layer of turf soil profile.

5. Spongy turf areas:
- Spongy under foot turf areas can also be a sign of grub activity.
6. Soapy water or wet towel method:
- Pour a bucket of soapy water over turf area at dusk and wait to see if grub surface.
- Lay a wet sack or towel on the turf overnight, grubs will be attracted to the moisture content at the surface and be under it in the morning.

How to treat lawn grubs
1. Application:
- An application of a contact (knockdown) turf grub product with an active ingredient such as Bifenthrin (e.g., Meridian, Venom, etc.) is recommended.
2. Prevention: attack can occur numerous times during a season.
- An application of a residual turf grub product with an active ingredient such as chlorantraniliprole (e.g., Acelepryn, etc.) bi-annually is recommended.
It is important to note that this document is a guide and other factors may be present or occurring in your turf. Please contact the appropriate turf professional for advice on treating your turf related issue/s.


